You may have noticed by now but over the past month I’ve been on a leak detection kick. It seems like nearly every other article is about detection or detecting products. What can I say. That’s just how my mind works. When I get focused on something I go and go until I burn myself out. All that being said I’m sitting here writing another article on refrigerant leak detection. I predict another four or five article before I move onto a different topic…
There are many types of refrigerant leak detection methods available for technicians and mechanics to use today. Most of them you have probably have heard of and others may be completely new to you. But the questions you may be asking is what are all of the different methods out there today? What are the Pros and Cons? What kind of detection do we recommend? What is the best way to find a leak? Let’s find out!
Before You Start
First and foremost before you even think about starting with an electronic leak detector, ultra-violet, or whatever else you have in your arsenal I am going to suggest something that will save you a ton of time and effort. When you realize that your unit, or the customer’s unit, is low on charge and you suspect a leak the first thing that I would recommend is to do a visual inspection. Yes, it’s that simple. Just look at it. What’s that saying? Keep It Simple Stupid.
Look at the unit up and down. Look at the liquid line. Look at the suction line. Look at the coils. Look at everything. Anything that may look corroded, worn out, or just an area that you suspect there to be a leak is your first stop. A red flag is when you see traces of oil. Oil is circulated throughout the refrigeration cycle along with the refrigerant so when you see oil on the outside of the coils, lines, or wherever then you know there is a problem.
When you identify the potential problem, or you at least have an idea where a leak is, then here is where I would suggest getting out your soap and bubble solution. I prefer the Nu-Calgon Spray Bottle. Sure, some guys will use their own homemade soap and water solution but with the store bought stuff you get the extra viscosity which allows the sprayed solution to actually stay on the desired surface. I’m sure some of you have your own recipes but I’ll stick with my pre-bottled stuff.
Spray the solution on the desired area then sit back and wait. Depending on the leak and conditions at the time you may begin to see bubbles quickly or you may end up waiting for a few minutes. Once you see the bubbles you can truly begin your diagnosis and repair. If you don’t see any bubbles after an extended period of them then it’s time to move on or to potentially pull out your electronic leak detector.
There is one more tip that I’d like to mention before moving onto the next topic. As you know most of the time when there is a leak it’s usually the coil. These can be sometimes difficult to visually inspect. Some techs out there will stick their gloved fingers in and gently feel around in suspected areas. They do this looking for one thing. When they pull their hand back they are looking for signs of oil on the tips of their gloves. If there is an oil residue then presto you’ve got your leak. That being said please note that I am not condoning shoving your hand into the blower, the fan, the lit pilot, or anything else. Be smart and be safe.
What About Electronic Leak Detectors?
You may have noticed by now that I have barely mentioned electronic refrigerant leak detectors. Why is that? Well folks I see electronic detectors as a last resort option. Detectors are meant to be a precise device. They are not meant to be swept across the entire unit inside and outside mindlessly. This takes up way too much time and effort. Hours could be wasted at a job going back and forth with your sniffer trying to find the mysterious leak.
The logical thing to do here is to do what I have said above. Use your eyes. Use your hands. Use your investigative procedures first before you get out the detector. Really think about where the leak could be occurring. Then, when you have an idea and you have a proposed spot where you think a leak is this is where you would get out your detector to narrow the search down even further. Like I said, it’s a precise instrument. You point where and if there is something it’ll move you closer to the culprit.
When you do begin using your electronic leak detector I would suggest moving your wand from a top to down motion on whatever section you are scanning. There are some guys who like bottom up scanning. They do this because refrigerant is heavier than air and you’ll be able to detect refrigerant flowing down if there is a leak. My concern here is that by using this method you are not finding the source of the leak. You only end up finding where all of the down flowing refrigerant is going not where the leak is originating. The top to down method will alert you the moment it senses the beginnings of a leak. This is really a matter of preference but I wanted to point it out here.
Types of Electronic Leak Detectors
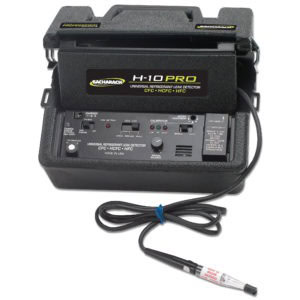
Before purchasing a detector we should identify what kind that you want, or better to say what kind you can afford. Now there are a few main types of detectors and they are: Corona-Suppression, Heated Diode, and Infrared. These detectors can range in cost from thirty or forty dollars all the way up to six-hundred dollars for a premium unit such as the H-10 Professional Leak Detector. (As a side note, the H-10 Model is one of the most beloved detectors on the market today.)
- The corona-suppression type of detector works by creating a high voltage corona in the sensing tip. When the corona senses refrigerant the device will sound an alarm. This type of leak detector is the oldest type and some models go all the way back to the sixties. (Yes that far!) Some guys love the tried and true tools like this, me I prefer something newer!
- The second type of leak detector is the heated diode. This type of detector works by heating the refrigerant and breaking the molecules apart. When the molecules are broken a positively charged Chlorine or Fluorine ion will appear. The heated diode will detect these ions and sound the alarm. The downsides to both of this type of detector, and the Corona Suppression, is that they can be overwhelmed if the refrigerant leak is too large. If the area is saturated with refrigerant then these alarms won’t be of much help and you may actually end up damaging your sensor and having to replace it.
- Infrared detectors work by drawing the air sample across an optical sensor that then analyses how much infrared radiation there is in that given area. The benefits of this technology is that the sensors last much longer, they are less prone to false alarms, they cannot be overloaded in an area saturated with refrigerant, and they are great at finding those very small leaks that other detectors just won’t sense. The Infrared detectors are the premium types of detectors on the market. Expect to pay a pretty penny for these babies.
- Now, there is a fourth type of detector that has been around for a while now called the ultrasonic detectors. These detectors work not by detecting refrigerant but by detecting the noise the refrigerant would make when it is being leaked. When refrigerant is leaking out of a unit, hose, compressor, or whatever it creates an ultrasonic sound that is so high a human ear cannot hear. The best thing about this type of detector is that it reacts by pressure and not by volume of refrigerant. The downside of this type of detector is that at times it can detect other noises that are around you and that are not coming from the unit you are working on. This could be especially troubling when in a large commercial building or plant environment with other machines going on all around you.
If you were to ask me my opinion on what the best kind of detector to get then I am going to have to say Infrared each and every time. Sure, the price is higher but you get such better quality, amazing leak sensitivity, and an extremely long sensor life. (Some of these sensors last up to ten years!) My two favorite Infrared units on the market today are the Fieldpiece SRL2(K7) and the Inficon D-TEK 712-202-G1 model.
What About Ultra-Violet?
Ultraviolet Dyes – This is an interesting way to find leaks especially on a unit that you know has a leak but you can’t quite pin point the exact location. This method works by having the technician adding the dye to the system and mixing it in with the lubricants/refrigerant. When the dye has been instilled in the system the tech then uses a black or blue light scanning the unit looking for signs of the colored dye coming out of the unit. There are a few downsides to this detection method that deters a lot of professionals from using ultraviolet dyes. The first is that it can take a significant amount of time for the dye to fully cycle through the system. That means there is a lot of sitting around and waiting. The second downside is that not all dyes on the market today are recommended by HVAC manufacturers. If you used the wrong dye over multiple times you could end up damaging or destroying the unit’s compressor and we all know that it is not a cheap repair.
Conclusion
Well folks that about wraps it up. As I said at the beginning of this article there are a variety of ways to detect, find, and diagnose refrigerant leaks. Rather you are a visual guy, a bubbles guy, or leak detectors or bust kind of guy make sure that you at least consider the other methods out there and give them a try every once and a while. I know it’s easy to get set in our ways but you may find that trying this new method may actually save you some time or help you find that evasive leak.